Your inbox re-imagined: You can control what you organize
You may be reading this because you’re lost in your inbox. You may feel like you’re drowning, barely treading water, in the lost time and effort you’ve put into your emails.
You’re probably misplacing important issues that need to get done and not tracking follow up from your colleagues as they are buried and missing emails as well. It all grinds to a slow halt of missed opportunities by you and your team.
It doesn’t it have to be like this.
The sound of your email notification doesn’t have to fill you with dread.
Email is supposed to be a great productivity tool. For me, it is. Thanks to a system I’ve worked to implement and tweak for 6 years, my inbox is organized. This process was an evolution for me in search of peace and structure.
Below are my Rules for Inbox Mastery. I think they’ll be a huge help to you.
Zero Inbox Rule
The zero inbox rule means that you clear your inbox to zero every single day. That’s right. Don’t let any emails live in your inbox. This is the peace part of the work flow.
I’m going to guess that your inbox is an unstructured jungle that is not kept in check. You lose emails, drop the ball, and become flustered at the number of emails you have that you have read and haven’t read, all mixed together.
That’s why you can NEVER let emails live in your inbox. The inbox by its nature makes you feel like you have so much work to do that is not value-added work. An inbox with 1000 emails in it feels like the seagulls from Finding Nemo……and that’s no way to work or live.
So, what do you do with all those emails in your inbox?
Structure
Structure is the organization of your inbox. How’s it look? How’s it operate? This is your new operations manual.
Your operations manual is simple. When an email comes in and you are processing it, you have 3 options:
- Deal with it now – one touch and it’s gone
- Mark it for ‘Action’ – will be dealt with later at a planned time
- Mark it as ‘Hold’ – waiting for others to deal with and get back to me. Never let someone’s else’s productivity problems mean you let emails sit and sit and sit in your inbox.
Deal with it now
Deal with it now. As you’re processing your emails and you find an email that you can deal with in 2 minutes or less, do just that. Deal with it. Respond, forward it on, delegate the task, delete it, archive it, unsubscribe from it, do anything other then leave it in your inbox. When you’re done handling the email, archive it or file it away.
Now not every email can fit into a one touch process. Some are projects, or you don’t have the time while you are processing, and some just need to be read in more detail. In those cases, you have two options:
Action Items
Action items are your planned work flow or backlog. These are emails that need your direct attention in some way: A project that needs a long planned time block or a task that needs your extended or focused attention. Something that is going to take longer than just a flash to get rid of.
The Action folder is where you will now live in your email. These are the items that require your attention and only you can accomplish them.
The benefit of trimming your email down to just Action items is that your brain can logically plan and wrap around what you need to do next. You’re not distracted by 200 emails in your inbox. You only see the 20 or 30 items that actually require your attention. You’ve filtered them into the action items and you know exactly what you need to work on.
Hold Items
The Hold folder is your safety net, the emails you don’t want to get away.
These are the items that you’ve sent out into the workflow of another person to work on. So why would you create a Hold item list? Because you know that others don’t organize their inbox like you. They might lose, forget, and delete your emails without responding to you, and you won’t know if the issue is addressed.
You’re smarter than this, and you know that you’re still waiting on a response from this person. So the workflow for your Hold items looks like this:
First, you send your Action items out into the world for a response and move the email from Action to Hold. If you hear back that the email is resolved, you can remove the Hold label.
Then, once a week at a regularly scheduled time (I do this when I’m prepping for the week on Sundays), you review your emails still labelled Hold.
This is when you bump your Hold emails with a “hey, pay attention to me!!!” email. A simple “Have you reviewed this? I’m still waiting for a response.” Following this process, you will never let another email fall through the cracks into the abyss of your All Mail folder.
Functional Organization
If you’ve made it this far your next question is OK, I’m IN and HOW do I actually organize my inbox like this? The next section is for you!
The email tool you use will influence this quite a bit. I am a G Suite Guy…I just love Google’s interface. Now, that does not mean that the functional organization won’t work with other email providers, I am only going to outline how to logistically pull it off in G Suite/Gmail. Follow the bubbles I have drawn.
Labels
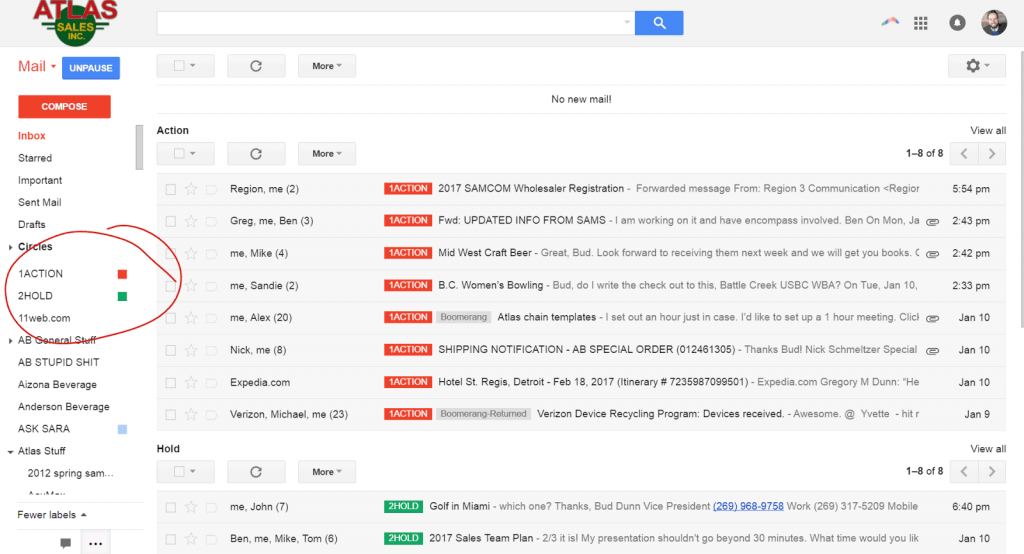
Step one is Labels. You will need two labels. If you are not a G Suite user they are just like folders, except that an email can have multiple labels assigned to it. You will need two main labels.
- 1Action – using the #1 will bring this label to the very top.
- 2Hold – using #2 will bring this label right behind the 1 action folder
Ninja Tip – I like to have my Actions in Red and my Holds in Green.
Multiple Inboxes
Next up is setting up your Gmail account to display multiple inboxes. This feature is very important to building up your Actions and Holds sections and bringing the details of what you need to work on next to the forefront.
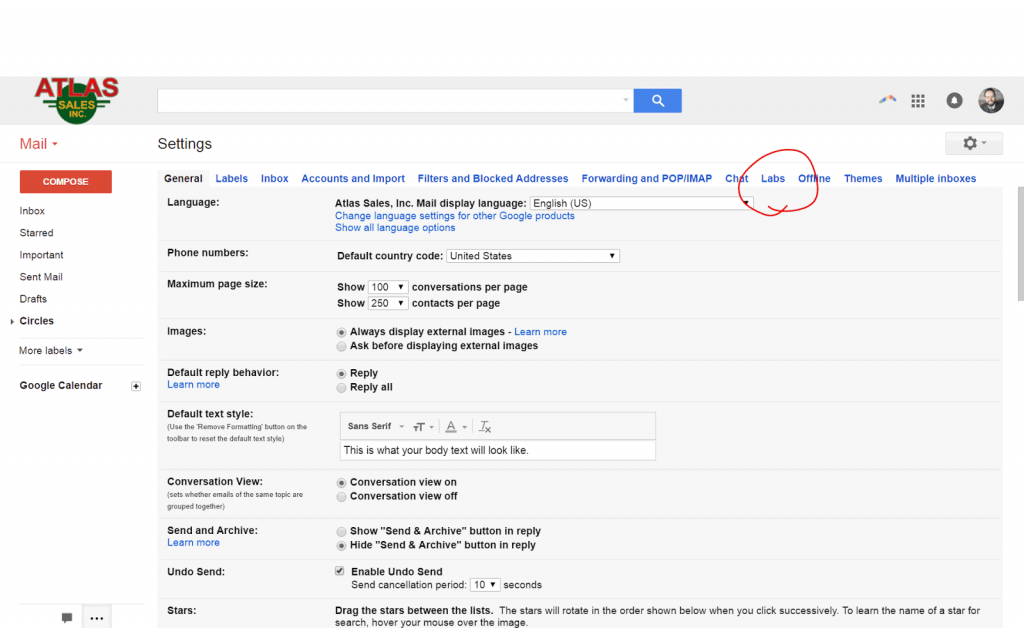
First, you will want to click on Labs from your main setting screen.
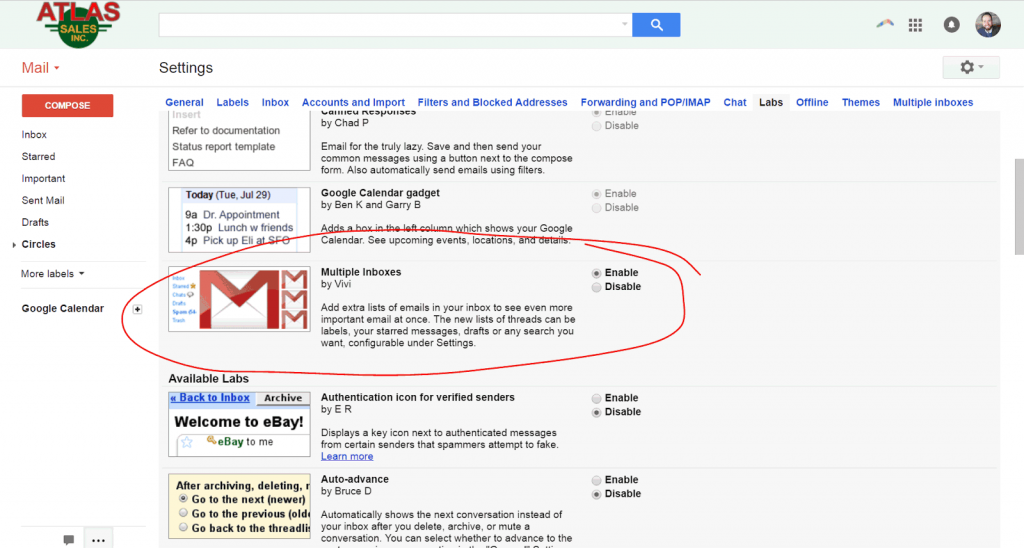
Then you will want to enable the Multiple Inboxes lab. This feature will let you see your inbox, then your 1Action, then your 2Hold labels in a row.
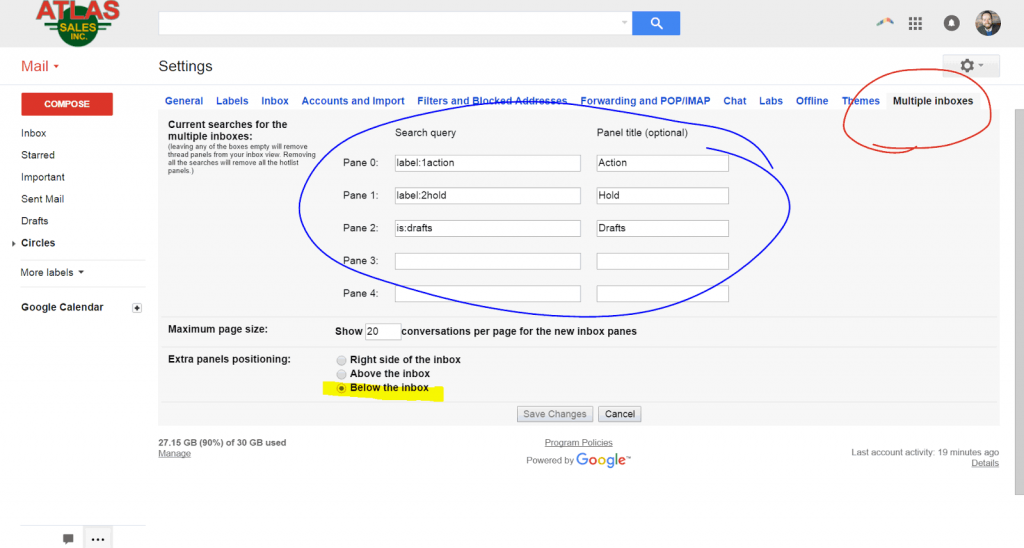
Now that you have multiple inboxes set up you will want to add the labels to those multiple inboxes so you can see your workflow in a visual progression.
First the Multiple inbox Lab will show up on the far right where the Red circle is. In the Blue circle you will want to follow the label description exactly like it is outlined below AND you will want to make the Action and Hold items show up below the inbox as shown in the yellow highlight.
Remember the plan…..is Zero Inbox, then Action, then Hold. The outlined settings below will create that visual look.
Drum Roll Please………..
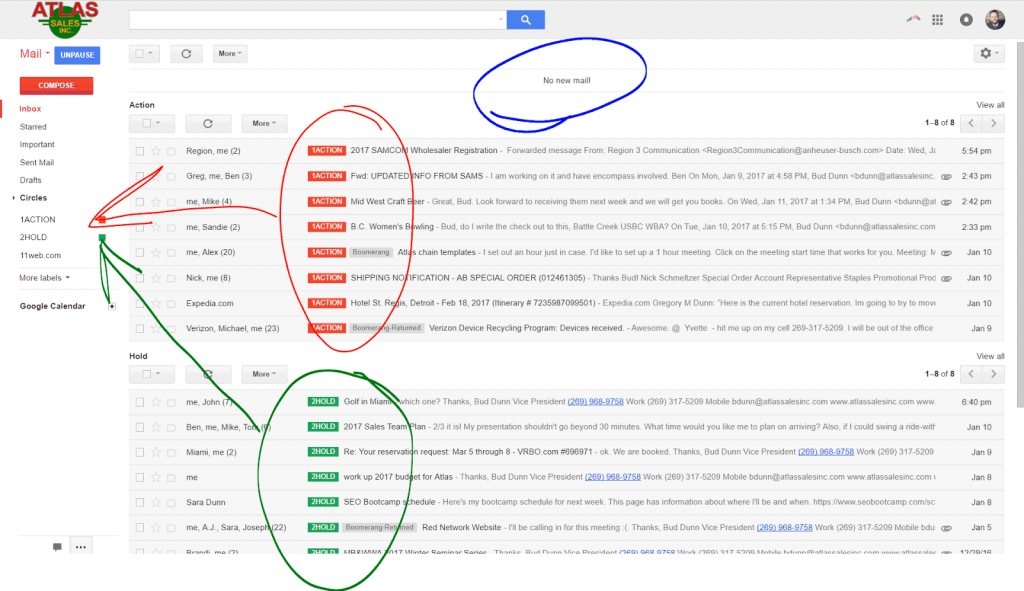
This should be the result you see. Blue circle = no mail in the inbox. Red circle = Action items that will be the first label in your left colum. Green circle = Hold items that will be below your inbox and your action items.
Summary
You now have have yourself organized and ready to kick some butt! I promise you that if you follow this email processing method, you will at the very least find yourself on top of your game and ready to cope with your working environment.
My goal is not to bore you, so I kept this post short. The next step in inbox mastery is a deeper dive on workflow and how an email ninja uses the multiple inbox structure to scale work and get more done.